Android App Development
How do we work our magic on the apps?
Hire us!
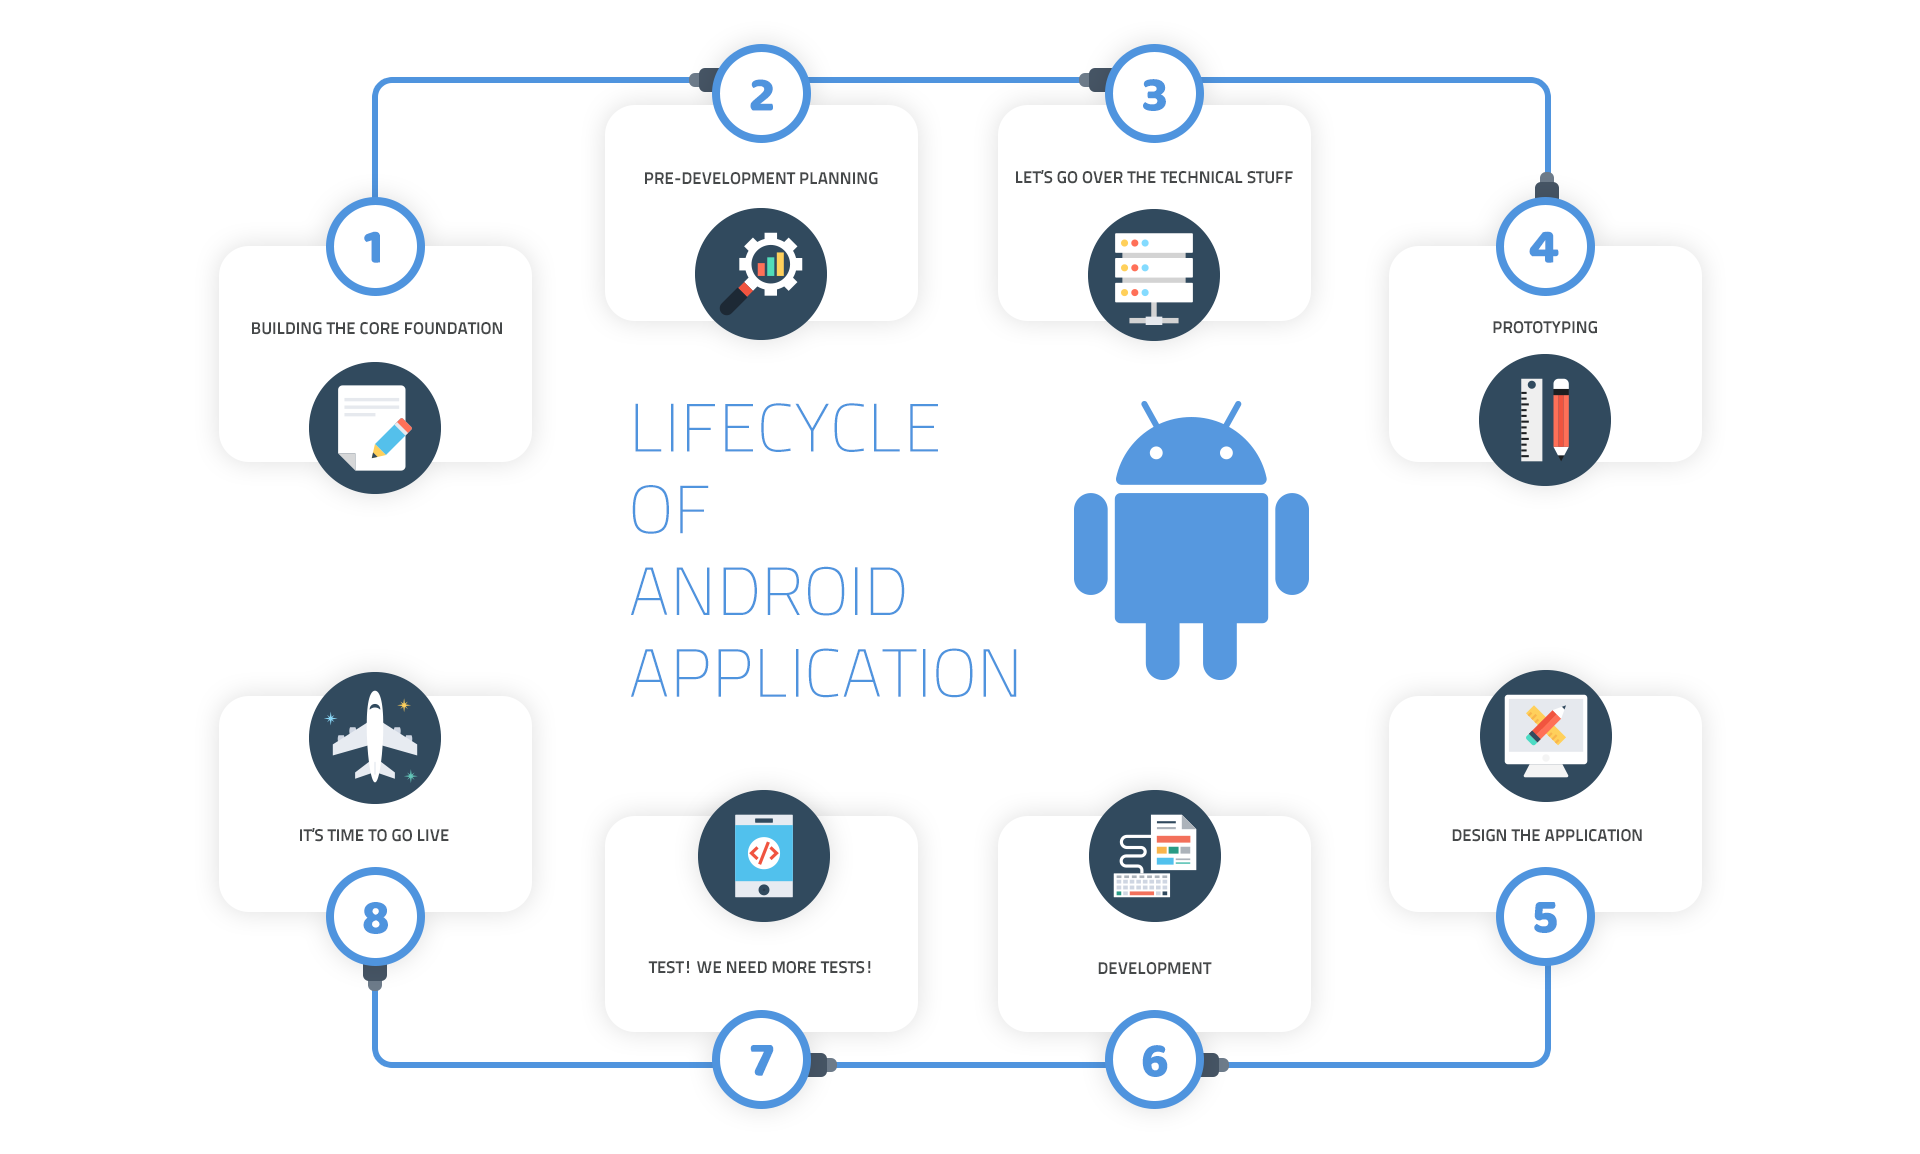
Stages of Android App Evolution
Pokemon aren't the only things that eveolve that fast, we at switch train the application to become the best application out there in it's category.
Android App Development
Let's talk about how we do the magic we're well known for.
PHASE 1: Building the core foundation
The first phase of developing the app is most crucial, this is the backbone of the project & how the entire lifecycle will evolve.
Step 1: Defining the application. Most clients come to us with just an idea & it depends on us to write it down and debate about its feasibility, what problem is it the app going to solve and it’s eventual productivity.
Step 2: Market Research: Going out and discovering similar apps & doing research on their approach & finding out their core, and how we can make our solution better.
PHASE 2: Pre-Development Planning
We, at switch, believe that a prototype stimulates our brains to better understand the written concept, to visualise it & play around with possibilities. This phase is all about the imagination & creativity.
Step 3: Bringing in the Big Boys i.e Developers. The development team are the technical architects of the project & they’re brought in to discuss minute details of the project. Details concerning the prototype & how will that translate over to code. They also help us in establishing a timeline for optimising the whole process.
Step 4: WireFraming- Bring out your overgrown babies aka artists. Then we make rough sketches on paper to chart out usability & the flow of the application. The first visual draft of the whole app.
PHASE 3: Let’s go over the Technical Stuff
Now for a regular user, their concern is limited to the design, the cool visuals & smoot, fancy animations.
But we need to rub our heads around all of the data stuff such as the back-end systems & the web services that go along with the app.
Step 5: Building Web Services- Now an application needs access to usable data & these are provided by web services, for example, showing location on a map or displaying a list of things. The webservices are very important because they have to be written for optimum performance & handle data efficiently, a lot of brainpower goes into creating & refining algorithmic logics.
Step 6: Android Optimization: The thing about android is that there are several device sizes & several OS versions ranging from 4.4 all the way upto 8.0 (Android KitKat to Android O) & we have to mull over specifics such as the behaviour & display of the app over all of these platforms to reach the maximum user base, only then the application can reach potential growth.
Step 7: Fine-Tune the Definition & Create Market Strategy: At this point, we’ve already refined many of the initial wireframes & improvised technical scenarios, at this stage the whole team is reviewing the wireframes before building the prototypes.
PHASE 4: Prototyping
The whole point of a smart phone is touch, and interaction with an app is completely touch based, so we create a prototype to understand and evolve the user flow, navigation & user experience.
Step 8: Fast pace prototyping, at this stage we’re concerned only with the behaviour of the application, so that we understand how it’s flowing & help our team to visualise the application and build it. It is also necessary for the client to see his idea slowly transforming into a physical entity.
So we bring in the clients to interact & play with the application for reviews & feedback.
PHASE 5: Design the application
( Play dress up with the app, make it look pretty )
This is where the fun starts,
Step 9: User Experience (UX) Designing: So here the whole architecture of the design is created, such as the interaction structure, the navigation details & the Design Elements. The UX designer also decides on important animations such as layout movement & the choreography of the elements when animated, the easing in or easing out. The animation graph for the choreography.
User Interface (UI) Designing: Now at this stage we dress up the application, bring in the colors, put it in some magic with vibrance. The UI designer adds the life into the application by adding graphic design & typography, also in certain cases cute logo svg animations or visual effects.
This phase itself has many review stages & is a multi-layered process but upon it’s completion the final output is pushed into the most awaited phase.
PHASE 6: Development
Here the big boys write the code for the application in Android Studio & build the actual application.
Step 10: Swift & Efficient Development. Our methodology of development is swift & efficient execution of development. The project manager & lead android supervisor oversee the entire process & optimise the code’s structure & it’s writing style to create high quality applications.
PHASE 7: TEST! WE NEED MORE TESTS!
It doesn’t just end at development, we are perfectionists and we have a compulsion to keep testing every little aspect of the application until we’re satisfied.
Step 11: User Acceptance Testing - Remember how we told you about the many android types, now we run a test across all device platforms & sizes to test the application.
Step 12: Intense Testing: Our testers go over the application with automated tools & manual testing together to find bugs, and create a daily list for our team to review and immediately fix, fine tune the application. At each stage we send a changelog & build, to the client and reel them in the whole process.
PHASE 8:It’s time to go live
Step 13: It’s time to launch
After all the sweat, blood & tears, we prepare ourselves to publish the application on to the playstore for review & it’s eventual launch on the playstore.
Step 14: Maintenance
After the application is launched, we commit ourselves to revise, edit & maintain the application. For example - bug fixes, improvements in performance & efficiency, etc.
 Chat on Whatsapp